Your Home: Do-It-Yourself Projects
Installing keyless door locks published on alliantenergygeothermal.com
|
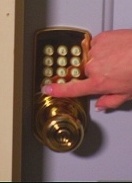
Your first line of defense in keeping your home safe is the door. If you are in the habit of losing your keys, or if you have kids in your family, you might want to consider a keyless entry system. They’re affordable, easy to use, and easy to install. The most popular are battery-operated, stand-alone models. They don't require any fancy wiring or complicated installation; and the keypad is mounted right on the outside of the door. To unlock the door, you simply punch in a code number … typically two to eight digits long … which releases the lever or knob.
|
|
|
|
|
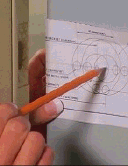
Step 1If it’s a new installation on a new door, the first step is marking the door. Using the template supplied with the unit, make two marks: one for the center of the hole on the face of the door … and one for the center of the hole on the edge of the door. Drill a 2-inch diameter hole through the door face for the handle assembly. To avoid splitting the wood, drill through from both sides. When you’re done, drill a 1-inch diameter hole in the door edge for the latch. |
|
|
|
|
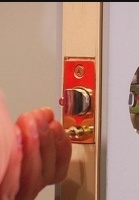
Step 2To install the latch, slide it into the 1-inch hole, being sure to keep it parallel to the door’s face. Mark the outline of the face plate on the edge of the door … and remove the latch. Then, using a small chisel, make a 1/8-inch notch for the face plate. Chisel just enough so that the plate is flush with the edge of the door. Insert the latch and secure it with the appropriate screws. |
|
|
|
|
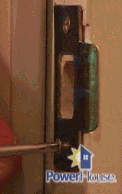
Step 3To install the strike, first close the door until the latch just touches the door jamb. Mark the top and bottom of the faceplate on the side of the jamb. Open the door, and extend both lines across the face of the jamb. Measure in to the center of the jamb … and halfway between the two faceplate lines … and mark the center point. |
|
|
|
|
Step 4Now drill a 1-inch hole into the door jamb. To ensure proper operation of the lockset, it must be at least 1/2-inch deep. Match the hole in the strike plate with the latch hole and outline the outside edge of the plate. Chisel a 1/16th-inch deep notch for the plate … put it in place … and secure it with the appropriate screws. With the door completed, you’re ready to install the lock and handle set. |
|
|
|
|
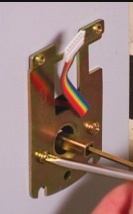
Step 5First, install the exterior handle or knob through the exterior faceplate and touchpad … and then through the door. On the inside of the door, secure it to the inside mounting plate. Now, connect the wiring from the back of the exterior face plate to the back of the inside handle assembly … and then attach the handle assembly to the inside mounting plate with the appropriate screws. |
|
Step 6Finally, turn the outside door handle to ensure that the latch assembly functions properly. |
|
|
Rule |
|
Step 7The last step is to program the lock. Each manufacturer will be slightly different, so be sure to follow the directions for your particular unit. |
|


Please note: These "do-it-yourself" guidelines are provided as an overview, and should not be used as the sole instructions for a home improvement project. Always read and follow the manufacturer's directions for the products you choose. Alliant Energy cannot be held responsible for injuries or damages resulting from these instructions.
CHECK OUT OUR OTHER LINKS:
www.belinelocks.com
www.cardlockusa.com
www.innlockcompany.com
www.innlockco.com
www.belinecctv.com
www.sjbreak90.com